
Four presentations and one two day clinic.
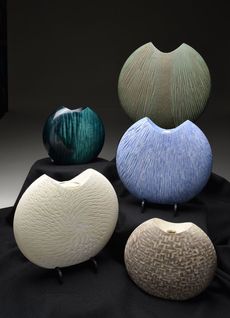
MultiAxis Flower Disc – Demonstration #1
This presentation is more than just a how to make a vertical disc functioning as a flower vase. There are several key themes woven into the presentation.
The handout will be my article from the June 2017 issue of the American Woodturner.
This presentation was given as the North Carolina Woodturning symposium in 2017. The Tidewater Turners videoed my demonstration and it can be viewed on my website, DennisBelcher.com under the Woodturning Articles Tab.
This presentation is more than just a how to make a vertical disc functioning as a flower vase. There are several key themes woven into the presentation.
- * Woodturning is a journey, not just making a thing.
- * The journey starts with a simple horizontal disc then progresses to a vertical disc that becomes a canvas for a multitude of coloring, texturing, and carving techniques.
- * The advantage of picking a form and mastering it rather than jumping from boxes, to platter, to bowls, to pens, to hollow forms. Doing them all, but not mastering any of them.
- * The importance of working out the sequence of operations before you start is stressed.
- And oh yes, the bulk of the time is spent actually making a multi-axis, vertical flower disc.
The handout will be my article from the June 2017 issue of the American Woodturner.
This presentation was given as the North Carolina Woodturning symposium in 2017. The Tidewater Turners videoed my demonstration and it can be viewed on my website, DennisBelcher.com under the Woodturning Articles Tab.
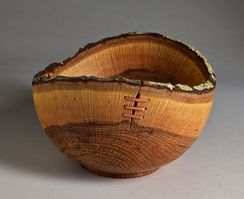
When Good Wood Cracks – Demonstration #2
It's a curse, and an opportunity, when wood cracks. The demonstration presents a series of techniques that take the curse of a crack and turn it into an artistic opportunity. This presentation flows from the article I wrote for the AAW's American Woodturner in the August 2015 edition. The article was a survey of techniques used by woodturners across the country to deal with a crack.
There are two key themes in the demonstration. The first is to show how to safely do each technique. The second is unleashing the creativity in the audience to resolve cracks in their own unique way.
Topics:
Art Theory. - How you can use a repair to make your pieces look more appealing. The point of turning a flaw into a design element is illustrated with simple vase that has a zipper in it and some white board time.
Dutchman and Butterflies – How to safely create a butterfly patch in a bowl. There is a discussion of stabilizing the wall with the repair, and the use of contrasting colors.
Splines - This is a repair technique suitable for wider flaws than the Dutchman technique. The creation of a custom spline with matching slot across the flaw will be shown. The safe use of a biscuit cutter in creating the slot is stressed.
Lacing – It sounds simple, but it is not. I will discuss the technical issues and how to solve walking drill bits, misaligned holes and other problems. The three key decisions in lacing will be illustrated with a sample board show a variety of lacing materials, lacing patterns and the key question of what to do with the ends. I will also talk about my favorite tools.
Staples – An alternative to lacing is the use of staples. I will show how to create a staple and to put it into the wood so that it is secure. A separate segment will show how to form hand forged copper staples for my work. Again, the tools that I use will be shown and discussed.
Cut it Out – This is the third choice for flaws. We can leave it, highlight it, or cut it out. I will show how to create a mountain range rim, a wave rim and the wrapped vase. The idea of using common items as inserts will be demonstrated.
Brass Plating – I will show silver plating on wooden bowl from 1562. Demonstration will include making the template, cutting the plate, and forming the plate to the curved surface, and creating hand formed rivets. Generally there is insufficient time to cover this topic in a typical club meeting. It is included in a clinic. This section requires an air compressor.
Dealing with a Torn Nub – I will discuss and demonstrate several methods to turn a torn nub into an artistic statement.
This presentation in its entirety will run approximately 2-3 hours of speaking time. The length can be shortened by removing topics.
Handout is a copy of my article “When Good Wood Cracks” from the August 2015 issue of the American Woodturner.
Board to a Vase - Demonstration #3
All woodturners have limitations. Those constraints can be equipment or our body. An attraction of this project is that it does not require a chain saw, heavy lifting, an extensive shop, deep hollowing tools, a truck, or a strong back. Only a lathe and a basic set of turning tools are required.
The idea is to glue up a vase blank rather than turning it from a solid block of wood. A glass tube insert allows you to use the vase with water. No need to hollow.
While the completed vase will be 8”, this technique permits scale up or down. Regardless of the size, no hollowing is required.
Instructions will be given on the proper use of a spindle roughing gouge, a bowl gouge, and drilling in a safe manner. The group will also be exposed to variation in design, and we will work on training the eye to see good form.
Variations in finishing techniques will be explored.
Most woodturners start life as woodworkers. This is an excellent transition project for the change.
This project will be one of the featured articles in the February 2021 issue of the American Woodturner.
A Primer for Drilling on the Lathe
This demonstration covers why turners experience “nasties” when drilling and what steps need to be taken to prevent them. Information about a Morse-Taper is presented, how to repair a damaged arbor, how to change out an arbor for a new one, the importance of cleaning the quills, and how to repair a damaged quill. Once the groundwork is laid, various drilling techniques are demonstrated with a discussion of the pros and cons of each.
Drilling to set depth of a turning, drilling small diameter pilot holes and using a chip clear gun drill round out the discussion of drilling.
Hand out is the article I wrote, “A Primer for Drilling on the Lathe” set to be published in the August Edition of the American Woodturner.
The typical comment heard from people after this demonstration is “I wish I had heard this years back”.
Turn A Bowl Clinic
This two day clinic flows from experiences of “Too Much” and “Too Little”. New turners are presented with too much information for them to absorb and too little repetition of basic techniques to solidify muscle memory. The goal of the two days of turning is to give them solid, basic bowl gouge skill through modules of lecture, demonstration, and turning.
A secondary objective of the clinic is to train local club members in teaching methods and techniques so that a club a core group of in-house instructors.
Evaluations completed by past attendees have give the clinic an average score of 5.0 on a scale of 1 to 5. When asked to rate the lead instructor on the same scale, the score was 5.33 (one student gave the instructor extra points for the humor during the lecture portions).
If you club has an interest in the two day clinic, please email or call and I will send a complete set of the speaker's notes for each of the modules, assistant homework, and handouts.